
Let’s kick this off by understanding what is a Retention Policy.
A Retention Policy is an organization’s established protocol for retaining information for Operational and Regulatory Compliance.
In Short, it means how long is the Organization allowed to keep the data for Operational needs. It includes, for example, the request for order right through to the Financial transaction and the laws of the specific country you are in regarding the Information received. Now understand I am no Lawyer and like everyone else, I need to base my action-based on the information I get from more Qualified People. This being said we can then start implementing Various Retention policies for Various information types. In this example, I will focus on Exchange (Mail) Retention for Office 365.
Exchange Admin Center
Firstly let’s go through to the Exchange Admin Center URL: https://outlook.office365.com/ecp. From Here on your left go to Compliance management and on the Right for the Retention Tags.
Retention Tags
To properly plan a Retention Policy you need to understand the different types of Retention Tags. A Retention Tag is Settings you can specify for when a message should automatically be Archived or Deleted.
The Three Types of Retention Tags
- Default Policy Tag
- Retention Policy Tag
- Personal Tag
What you need to keep in mind is you can create multiple of each Tag to assign to Various Retention Policy’s. Even though the Policy will restrict you to only a certain amount of each Retention Tag to a Retention Policy, you will still need to be able to Identify each Tag. So it is very important to Name and Describes your Tag for Administrative Purposes correctly.
Also, note a Single Tag can be applied to Multiple Policies, but a Mailbox can only have One Policy assigned to it.
If your intention will be to assign different Policies for different region keep this in mind when creating the Tags.
Lastly the Retention Age for and Item is Calculated from the day of Delivery or Creation if the Item has not been sent.
To Start creating a Tag click the Plus symbol and choose which one of the Policy Tags you want to create.
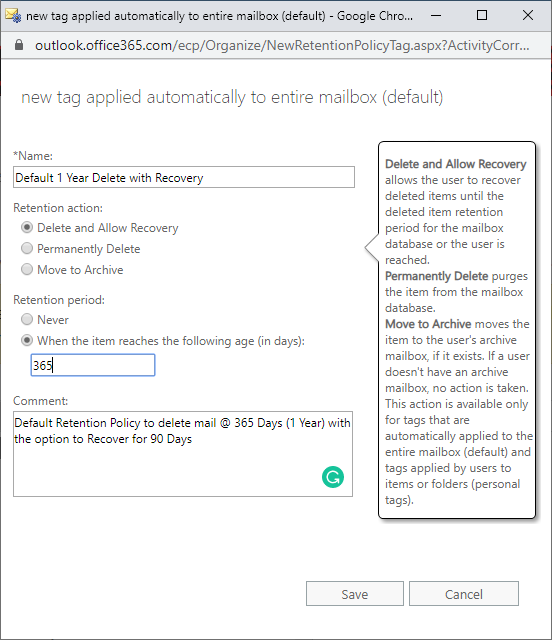
Default Policy Tag (DPT)
This applies to All items that do not have a retention tag assigned to it.
It gets applied by the Administrator and Users can not change the Tag
There are two settings to choose from here:
Retention Action
Are you going to Archive or Delete (Delete can be done with 90 recovery Period)
Retention Period
How long in Days before the Tag will take effect on the Item
The reset is the descriptive settings for the Admin to assign accordingly.
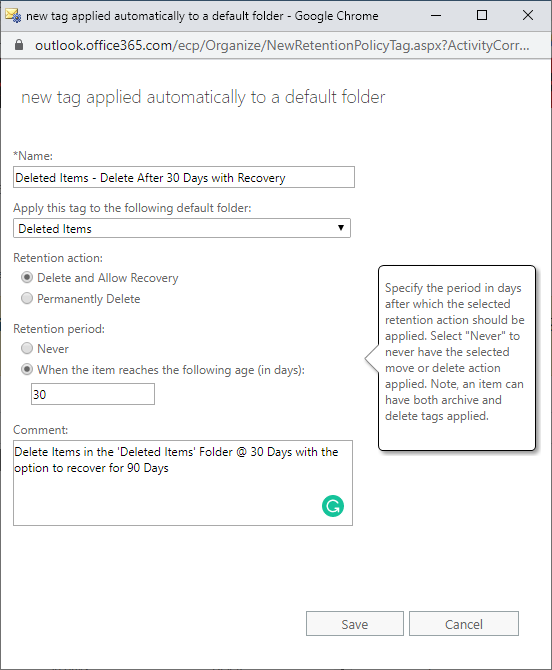
Retention Policy Tag (RPT)
This applies to all Default Folders that get created with a mailbox.
Example: Inbox, Deleted Items, Sent, Junk, etc…
It gets applied by the Administrator and Users can not change the Tag
There are three settings to choose from here:
Default Folder
The Dropdown will show a list of Default folders. This will only apply to that specific folder.
Retention Action
The only option to Delete (Delete can be done with 90 recovery Period)
Retention Period
How long in Days before the Tag will take effect on the Item
The reset is the descriptive settings for the Admin to assign accordingly
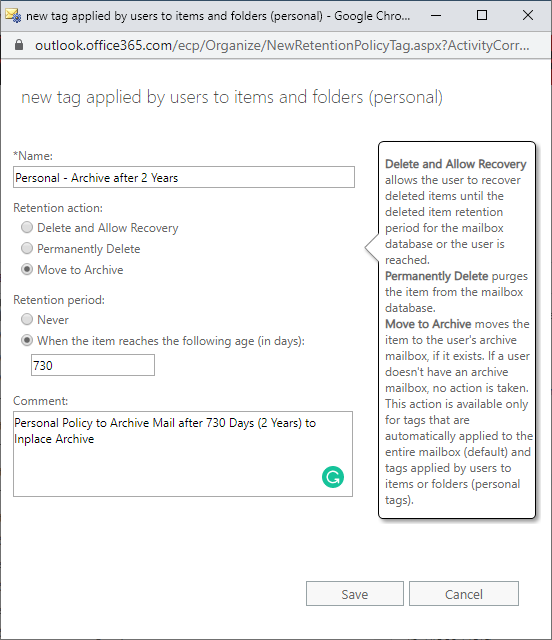
Personal Tags (PT)
This applies to Custom folders or individual Items such email Messages.
The Settings are exactly the same as the Default Policy Tags with the only difference being Users will be able to assign these to the Custom Folders they create. Normally these folders will have Rules associated with them to automatically move mail into them.
Suggested Tags
When Creating these Tags I suggest something along with the below Table.
There are a few reasons for this, depending on your office license you have you only have a certain amount of Space in your Primary Mail Box. When the option for the archive is enabled you get the same amount of Archive Space.
An example is your Primary Mailbox is 50 GB then your Archive Mailbox will also be 50 GB. With a lot of companies not knowing how or having the option to send a link as an attachment, mailboxes still get cluttered up with attachments and to have a reference, people don’t delete attachments even though a newer one was sent. Thus, in turn, the same file can be in every user’s mailbox twenty times each one with some or other change.
The problem with this is the 50 GB mailbox gets full quickly and an Archive of 5 years just is not sufficient anymore. In some cases, I have seen mailboxes on a 1 Year Archive that is still 20 GB in size.
The Other reason will be compliance according the laws of the Specific Country\region.
Last Reasons would be:
Junk Email – If not action-ed in 14 Days, it is Junk!!!
Sync Issues – Probably Already resolved or a repeat of the same log again
Deleted Items – This is not a Storage Place, If you Delete it you don’t Need it
| Name | Type | Retention Period | Retention Action |
| Default 1 Year Archive | DPT | 365 | Archive |
| Default 2 Year Archive | DPT | 730 | Archive |
| Default 3 Year Archive | DPT | 1095 | Archive |
| Default 5 Year Archive | DPT | 1825 | Archive |
| Default 1 Year Delete | DPT | 365 | Delete |
| Default 2 Year Delete | DPT | 730 | Delete |
| Default 3 Year Delete | DPT | 1095 | Delete |
| Default 5 Year Delete | DPT | 1825 | Delete |
| Personal 1 Year Archive | PT | 365 | Archive |
| Personal 2 Year Archive | PT | 730 | Archive |
| Personal 3 Year Archive | PT | 1095 | Archive |
| Personal 5 Year Archive | PT | 1825 | Archive |
| Personal 1 Year Delete | PT | 365 | Delete |
| Personal 2 Year Delete | PT | 730 | Delete |
| Personal 3 Year Delete | PT | 1095 | Delete |
| Personal 5 Year Delete | PT | 1825 | Delete |
| Junk Folder 14 Day Delete | RPT | 14 | Delete |
| Deleted Items 14 Day Delete | RPT | 14 | Delete |
| Sync Issues 14 Day Delete | RPT | 14 | Delete |
Retention Policy
By this time you would have familiarized yourself with either the Regulatory Laws you need to comply with or you know the Limitation of your MS Office Licenses which will guide you on how you intend to set up the Policy.
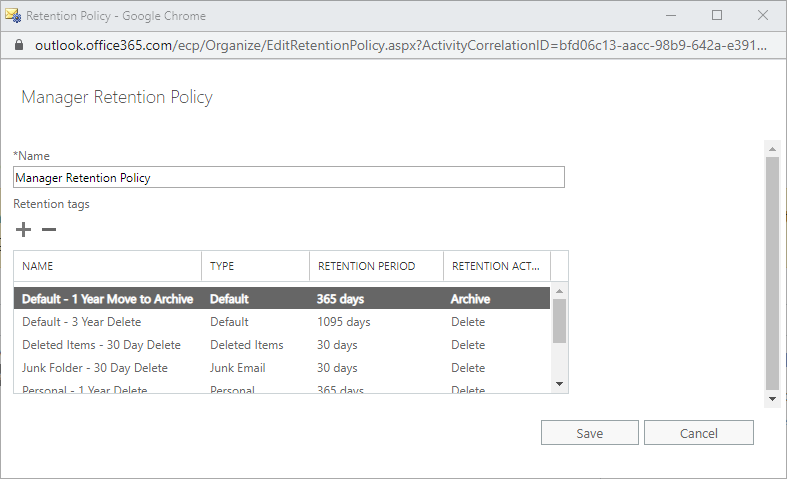
The Tags you created gets assigned to a Retention Policy. So as an example lets take a Manager in a company that works with a lot of Historic Data and then an Operation Employee that rarely needs to go back six months of their mail. You can create a Policy for each Type.
Again let’s go through to the Exchange Admin Center URL: https://outlook.office365.com/. From Here on your left go to Compliance management and on the Right for the Retention Policy.
Click on the Plus sign to start the creation of the new Policy. You can set the Policy Name as “Manager Retention Policy“. Then click on the Plus Sign again then you will be able to see all the Retention Tags Created. Now you can decide which Tags will apply to a Manager Role.
There are a Few Limitation when Assigning Tags.
Default Policy Tags:
Only one of a specific action can be assigned. This means One Default Tag that Deletes and One Default Tag that Archives.
This is fairly logical when you think about it. The only thing you need to take into consideration is to have the Archive happen before the Delete.
Retention Policy Tag:
Similar restriction but this is limited to one per Default Folder.
So you can not have two Policies for the ‘Deleted Items’ Folder.
Personal Tag:
No restriction on the amount of but keep in mind some users tend to get overwhelmed with too many options. So keep it Simple Limit the number of Archive Tags to Maximum Five and the Delete Tags to Maximum Five.
Manager vs Operations
As per the below Images you can see there is a difference in the way a Mailbox is allowed to keep data.

Assigning a Policy
With the Policies Created we need to assign the Policy to the necessary mailboxes. This can be done in one of two ways.
- Web Interface
- Power Shell.
Web Interface
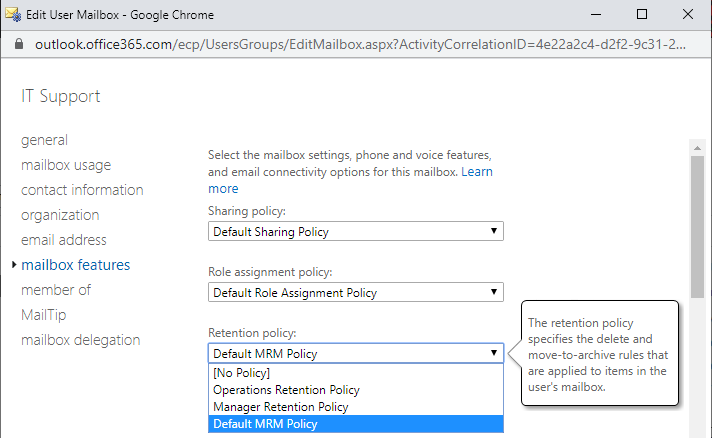
Browse too URL: https://outlook.office365.com/ on the left hand go to recipients and on the Right-Hand side choose Mailboxes. From here you can search for the user you require and double Click. This will open a new window which you can then go to Mailbox Features and withing the Retention Policy Drop-down the Newly created Policies will be Displayed.
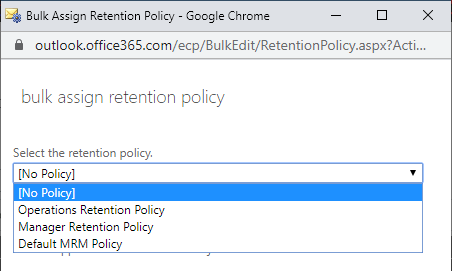
To do the Same for Bulk assignment hold shift while selecting the users you want to assign with. On the Right side then go down to More Options… and choose Retention Policy Update…
Power Shell
The Web Interface will set the required Policy but will only run once the Managed Folder Assistant service runs and this can take up to seven days. In PowerShell, you can set the Policy as-well-as Run the Managed Folder Assistant Immediately.
Below is a step-by-step guide to applying the same policy to all users. You can modify the query to apply on Users with Specific attributes as you require.
On a Local Computer Open PowerShell. I always prefer to run as an Administrator but it is not required for this. First, we need to set the credentials for the user that has the rights to set Policies. A pop up will appear to enter the Credentials in.
$UserCredential = Get-Credential
Next make a connection to the Exchange Server with the provided Credentials:
$Session = New-PSSession -ConfigurationName Microsoft.Exchange -ConnectionUri https://outlook.office365.com/powershell-liveid/ -Credential $UserCredential -Authentication Basic -AllowRedirection
Import the Session
Import-PSSession $Session
Make sure you are connected successfully. This should give you a list of mailboxes for your domain:
Get-Mailbox
Run Managed Folder Assistant for All User Mailboxes. This will Execute as per what is set on the Web Interface.
$Mailboxes = Get-Mailbox -ResultSize Unlimited -Filter {RecipientTypeDetails -eq "UserMailbox"}
$Mailboxes.Identity | Start-ManagedFolderAssistant
To Assign a Policy to s single user:
Set-Mailbox "FLUKE" -RetentionPolicy "Manager Retention Policy"
Assigning a Policy to Multiple users with the Same Attribute
Get-Mailbox -OrganizationalUnit "Management" -ResultSize Unlimited | Set-Mailbox -RetentionPolicy "Manager Retention Policy"
View a Current Users Retention Policy:
Get-Mailbox Morris | Select RetentionPolicy
Get All Mailboxes with a Specific Retention Policy:
Get-Mailbox -ResultSize unlimited | Where-Object {$_.RetentionPolicy -eq "RP-Finance"} | Format-Table Name,RetentionPolicy -Auto
With the above commands, you can get started applying all policies by simply getting the correct attribute to look at and use it in your command.
Organization Wide Policy
As there will always be new Users coming into the company there is a way to set a Generic Policy for all Newly created accounts. Alternatively, I suggest adding this to your New User Check List.
To do this you still connect to the Exchange Online as per the above instructions. You can then view your current Default Policy by running the below command:
Get-MailboxPlan | Format-Table DisplayName,RetentionPolicy,IsDefault
To change the Default Policy you can then run the command:
Set-MailboxPlan "ExchangeOnlineEnterprise" -RetentionPolicy "My-Generic-Policy"
To check that is worked just run the first Command again.
Final Note: Disconnect
The one thing you always want to do is disconnect your session to Exchange online. Simple code:
Remove-PSSession $Session
If you don’t disconnect your session with stay alive until your session expires. This can cause issues when trying to connect again. Secondly from a security point you never know what is going to happen, your machine might be open on the last session you worked on when somebody gets access. Rather be Safe than Sorry.